Friday, December 16, 2005

My crayon scarf!


Finished this for a xmas present for my littler brother. It was inspired by a novelty plaster (plasters are bandaids - for the non-Brits). I want to make a whole set of them now. Maybe even a pencil to go with them too...

Its a bit short as a scarf for my tastes but it's backed with fleece which makes it super-warm so you don't need to double it round your neck and goes once-round quite neatly. Also, because its backed with fleece you can wear it with the plain black showing (rather than just busting the whole "my sister knitted me a novelty intarsia thing for xmas" look...)

Materials:
  • 2 balls MC and I CC (both Patons Gold DK - though my gage was a little loose and I'd maybe try aran weight if I did it again)

  • 1 pair 4.5mm needles

  • 1 tapestry needle

  • Set of bobbins

  • Also, to back, you'll need about 1m by 20cm of black fleece (this is generous, but should do it, I suggest you knit then measure before you buy), a normal sewing needle and some black cotton thread.


Gage and measurements:
17sts and 23rows to 10cm x 10cm square in st st. Note my knitting is very loose so you should check your gage first, you might want larger needles. It’s worth matching gage because proportions are everything in this. If it’s too tight, it’ll not only be a bit “skinny” for a scarf, but pretty short too. The whole thing measured nearly 1m.

Instructions
Its stocking stitch throughout.

CO 10 sts, and m1 at the end of each row till you have 22sts. Knit in st st till it measures about 11cm. CO 4 sts at the end of each row (so you now have 30 sts in total) and knit for another 5cm.

Swap to CC, and knit 6rows, then 4rows MC, 2 rows CC.

Knit 20rows CC.

*K11 CC, change to CC, k8, swap back to CC and knit to end.
P8 CC, p14 MC, p8 CC
K5 CC, k20 MC, k5 CC
P5 CC, p20 MC, p5 CC
K5 CC, k20 MC, k5 CC*

Now pause to draw yourself out a chart for the label. I'd pass on mine but its paper and covered in scribbles, its easy enough to do your own. You might want to change the shape at the ends of the label, I'm not sure about mine. I used the letter grid from Magknits' Crime of Fashion scarf. The letters are the MC (in my case blue) with a CC (black) boarder of four sts either side. there will be 5 MC either side of that. Which means at times you'll have up to seven bobbins going at once.

Don't be tempted to faire-isle it, it'll go all lumpy. Also, remember you're working from the "N" up (or "A" if your going to make it say crayola).

Knit and purl and bobbin away till you've got to the end. repeat the section * to * but back to front (so it mirrors the start.

Knit 20 rows in MC, 2rows CC, 4rows MC, 6 rows CC, 14 rows MC.

Cast off, weave in ends, go to your friendly local fabric shop for some black fleece to back it with.

Saturday, October 22, 2005

lovemeknot pattern

Materials:
Two contrasting solid colours of sockyarn, at least 200 meters of each.
Tape measure (metric)
Dice
2mm (US size 0) circular needle, 80cm in length. Or set of dpns if you prefer not to magic-loop
Waste yarn for provisional cast on
Tapestry needle for weaving in ends

Gage (important) 32 sts to 10cm

Pattern Notes

This pattern uses Wendy’s toe-up pattern, there is an excellent knitty article on the subject if you haven’t tried it before.

This is written with magic-loop in mind, but proficient dpn user should be able to read it – you might find placing a stitch marker half way through the round helps (notes on the magic-loop technique can be found here).

It might seem odd to have the hearts on one side of the foot rather than the middle, but it helps make the illusion visible around the shape of the foot and ankle. The effect works on either side of the foot, so you don’t have to worry about having left or right socks, although depending on the shape of your ankle and you may have a preferred way round to wear them.


Illusion knitting (in the round)

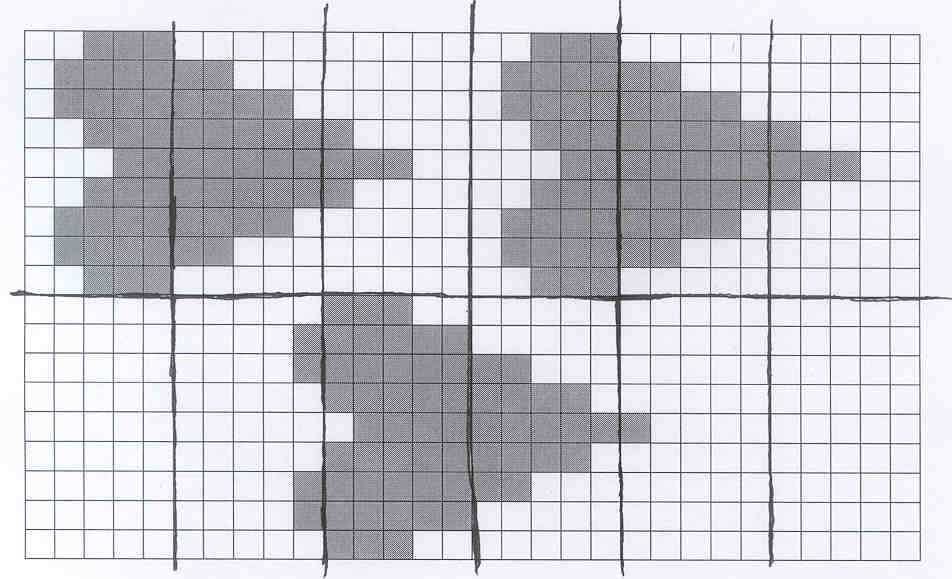
Each row of the chart is actually four rounds of knitting, one double-round stripe of each the MC and CC. The CC is, at heart, stocking stitch, giving a nice flat surface, where as the MC is based on the bobbles of garter. By swapping the MC to stocking you create a little valley, looking at the work from an angle you see through the valley onto the next “mountain” of garter stitch, which you provide by a corresponding swap of stitches in the next CC stripe.

When you work from the chart, for each row of the chart:
(CC) knit one round plain
(CC) knit the blank boxes, purl the filled in ones
(MC) knit one round plain
(MC) purl the blank boxes, knit the filled in ones


Credit: the chart is based on this design.

Illusion knitting in the round is easier than flat – because you always work RS, you can normally work out what you need to do from what’s been worked the rows below. Also, I choose to use this heart pattern rather than building a new one because its so beautifully logically put together, once I’d set up the first couple of rows I hardly needed to refer to the chart at all. Perfect bus knitting.

Pattern

Measure around the ball of your foot in centimetres, multiply this by 3.2 and divide by too. Round up the result to the nearest even number and this is how many stitches you will provisionally cast on using the CC.

For me, this number was 36, so using a crochet chain of waste yarn and the CC, I cast on 36 stitches.

Once cast on, start to work your short-row toe entirely in the CC. If you have a favourite way of doing this, go right ahead or check Wendy’s toe-up pattern for details.

Once complete and the provisional cast on is unzipped you should have half your stitches on one needle (the top of the foot) and half on the other (the underside of the foot). If you are dividing the stitches over more than two needles (i.e. using dpns) place a stitch marker so you know where the half way mark is.

Bring in the MC yarn and using it, knit one round.
Still using MC, purl to the end of the first needle/ stitch marker and then knit to end of the round.

Note: throughout, when changing colour just carry the yarn up, no need for a stupid number of ends to weave in.

Throw your dice (sorry “di”, singular). If you get an even number, start the chart on the 10th row (that’s row of the chart, not row of knitting), if you get an odd number start from the beginning. I threw an odd number, so start the pattern with one heart rather than two.

Swap to the CC and start to work the chart.

The chart is fewer stitches than the width of your foot (unless you are a pixie). Work the chart at the start of the round, once complete continue till the end of the needle/ stitch marker as if you were working blank charted boxes, then complete the round with nice flat stocking stitch for the underside of the foot.

Continue in pattern, following the chart, until the sock is about 5cm less than the length of your foot (you can put it on and try).

Hold the patterned half the sts (ones for the top of the foot) on an unused bit of needle/ dpn and work heel in the CC. This is done exactly the same way as the toe.

Once the heel is completed, slip the held stitches back into play and continue to work the striped illusion chart pattern in the round. This time you are going to repeat the pattern on the back of the sock as well as the front. However you want to work the chart at the end of the round rather than the start so that the hearts all collect near each other (again this sounds weird but is to do with the way the pattern arranges itself around the ankle). Work as a blank charted box until the last 30 stitches, then work the pattern till end of round.

Work in pattern until 1.5cm from desired length, ending after a patterned MC round. You should aim to finish this sock will half the CC yarn left.

Change to CC, knit one round.
Work 5 rounds of 1x1 rib.

Cast off loosely.

Count the number of completed hearts on the sock. Odds you love them, evens you don’t (or any other yes/ know question you wish to ask of the socks). If you don't like the answer give the socks to someone as a gift, this will bring good luck to all.

Now repeat process for second sock. If you prefer your socks to be a mirror-image of each other (and I do, I think it comes from being named Alice):
(a) reverse the chart for the second sock so the hearts point the other way, and
(b) swap which side of the foot you put the pattern on - i.e. for the top of the sock, knit to the last 30 stitches then work the chart, then when you have done the heel and are patterning the back too, on that side of the sock work the chart from the start of the second needle/ after stitch marker.

Warning: these socks are magical. If you do not finish the second one you will be cursed never to love again and the ghost of Virginia Woolf will come and haunt you. She is a long winded old cow who never shuts up and you don’t want this.

Wednesday, October 05, 2005

boyfriend socks pattern

steps at wapping tube 4


SIZE
S [M, L] (my pictures are in size M)

Small – foot circumference of 23cm/ 9 inches
Medium – foot circumference of 24cm/ 9 and a half inches
Large – foot circumference of 25cm/ 10 inches

You can also vary size with needle size (though too-loose a gage will stop the cables popping so well), but the stretchy nature of the pattern is very forgiving.

The pattern is variable to length of feet knitted for – just work foot section until desired length.


FINISHED MEASUREMENTS
Finished sock measured 55cm/ 21 and half inches in length.

MATERIALS
Lorna’s Laces Shepherd Sock solid [80% superwash wool, 20% nylon; 215/196 per 60g skein]; color: Pewter; 2 skeins.

US 0/2mm needles - either double-pointed, a long circular or two circulars.

Embroidery needle
Cabling needle
Stitch markers (optional)
Row counter (optional)

GAUGE
32 sts/44 rows = 4" in stockinette stitch

PATTERN NOTES

C6F: place first 3 sts on cabling needle and hold in front of work, knit next 3 sts, knit the 3 sts from cabling needle.
C6B: place the first 3 sts on cabling needles and hold behind work, knit next 3 sts, knit the 3 sts from cabling needle.

Stitch pattern
Rnd 1: k, p2[2, 3], k2, p2[3, 3], k2, p2, k6, p2, k6, p2, k2, p2[3, 3], k2, p2[2, 3], k
Rnd 2: as Rnd 1.
Rnd 3: k, p2[2, 3], k2, p2[3, 3], k2, p2, C6F, p2, C6B, p2, k2, p2[3, 3], k2, p2[2, 3], k
Rnds 4-6: as Rnd 1.

Repeat rounds 1-6 twice more.

Rnd 19: k, p2[2, 3], k2, p2[3, 3], k6, p2, k2, p2, k2, p2, k6, p2[3, 3], k2, p2[2, 3], k
Rnd 20: as Rnd 19.
Rnd 21: k, p2[2, 3], k2, p2 [3, 3], C6B, p2, k2, p2, k2, p2, C6F, p2 [3, 3], k2, p2 [2, 3], k
Rnds 22-4: as Rnd 19.

Repeat rounds 19-24 twice more.

Repeat rounds 1 to 18.

PATTERN

Toe
Using figure eight cast on, cast on 24 sts (that is 12 on each needle) and knit one round. You can place stitch markers at the start and middle of the round to show where the sides of the sock will be. Magic-loopers need not bother, and can just read "sm" in the pattern as meaning the end of the needle.

Rnd1: kfb, k to st before sm, kfb, kfb, k to last st, kfb.
Rnd2: knit
Repeat till 72 [76, 80] sts in total.

Foot
Work first round of stitch pattern once, this should take you half way on the round, knit to end.

Continue as this, working stitch pattern once for top of foot, then knitting till end of round for the second half of the stitches (for the sole). Work until sock measures 5cm/ 2 inches less than length of foot.

Keeping in pattern, work stitch pattern for first half of round and hold these stitches to work the heel over sole stitches.

Heel
Row 1: Knit to last stitch, move your yarn as if to purl and slip the last stitch from the left needle to the right needle. Turn work.

Row 2: Slip the first (unworked) stitch from the left needle to the right needle, and purl to the last stitch. Move the working yarn as if to knit and slip last stitch. Turn.

Row 3: Slip the first (unworked) stitch from left needle to the right one, knit to the last stitch before the unworked stitch. Wrap and turn.

Row 4: Slip the first stitch and purl across to the stitch before the unworked stitch. Wrap and turn.

Repeat rows 3 and 4 until you have 12 stitches left unwrapped in the middle of the heel.

Row 1: Knit across the unwrapped stitches to the first wrapped stitch. On this, pick up the wrap and knit it together with the wrapped stitch. Wrap the next stitch, so it has two wraps, and turn.

Row 2: Slip the first, double-wrapped, stitch and purl across to the first wrapped stitch on the other side. Pick up the wrap and purl it together with the wrapped stitch. Wrap the next stitch and turn.

Row 3: Slip the first, double-wrapped, stitch, and knit to the double wrapped stitch on the other side. Pick up both the wraps and knit them together with the wrapped stitch. Wrap the next stitch and turn.

Row 4: Slip the first, double-wrapped, stitch, and purl back to the double wrapped stitch. As before, pick up both the wraps and purl them together with the wrapped stitch. Wrap the next stitch and turn.

Repeat rows 3 and 4 until all stitches have been unwrapped and knit to the end of the heel stitches

Cuff
Bring the stitches from the top of the foot back into play and continue in pattern, this time repeating the stitch pattern a second time for the stitches at the back of the foot.

You may want to pick up stitches at either end of the heel and knit them together with the next one to prevent holes at the sides of short-row heels.

Continue until sock has reached desired length or you have run out of yarn.

Work in 1x1 rib for 10 rows.

For the medium and large sizes, where you have three purl stitches together you may wish to p2tog at the start of these (i.e. turning three stitches into two) to make a neater transition from 2x2 rib based stitch to the 1x1.

FINISHING

Break the yarn, with about three times the sock circumference to spare and thread the end through an embroidery needle.

Step one: Pass the needle through the first two stitches on the (knitting) needle as if you were purling but keep them on the needle and pull the yarn right through.

Step two: As if to knit bring the yarn through the first stitch and let it drop off the needle.

Repeat these two steps all the way round. Secure end by passing yarn through first cast off stitch.

Weave in ends.

Repeat whole process for second sock.

lines on dock

Monday, September 19, 2005

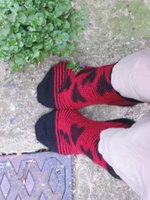
lovemeknot (socks)

Click on the images to enter the pattern.

A girl rests herself quietly in Tavistock Square, a little oasis of green in the middle of London, surrounded by blue plaques hinting of lives, loves and deaths of the infamous Bloomsbury set. She sits sinking her bare toes into the grass, ripping up daisies, pleading with them to provide answers for her heart. Like millions before her she plucks petal by petal off the flower head. "he loves me, he loves me not, he loves me..."

But our girl suffers from that endless uncertainty which comes with empirical research. One flower says yes, but the other said no, five out of seven said yes, but what if the sample wasn’t big enough? And there’s always the issue of whether the daisy came to her clean (maybe a petal fell off before she got to it). Often the flowers fall to pieces in her desperately questioning fingers.

Her mission plucks Tavistock Square clean of daisies. She rushes over to the next patch of green, and devours it too. Soon every daisy in the city has been torn to pieces and our girl is sitting on a bus fleeing the crowds of gardeners after her blood. So she takes out her trusted addi turbos, magic-looping her way to a pair of socks and, with them she hopes, the truth.

The hearts are illusion knitted. Now you seen them, now you don’t. As you point and relax your toes you’ll see them come and go. As they work their magic, recite your question. The design is toe-up, made to measure. The number of pattern repeats will therefore depend on the size of your foot. Once knitted, count the hearts on one (and only one) sock: odds say yes, even’s don’t.

Monday, August 22, 2005

Frillybits: An Exercise in Wild Knitting

frillybits - side view

This design is very flexible. Literary - the cords that run down the sides allow it to be scrunched into a tight frill or relaxed out into flatter piece. In the hair, it can be worn as a girlish Alice-band or frilled up into a scrunchie. It also works round the neck as an elegant, rather Edwardian, “ruff” of a scarf. Or, if you want to be “wild” in a slightly risqué way, high on the thigh as a frilly garter.

frillybits - stretched

Play with different yarn combos. Left-over ends of hand-painted sock yarn, oddments of mohair you can’t bring yourself to throw away – it’s a great stash buster.

frillybits - scrunched

Materials
  • MC, approx. 40m 4ply yarn.
  • CC, approx. 12m 4ply yarn.
  • 2.5mm circular needle, any length.
  • Stitch markers (optional).
  • Embroidery needle.
  • Either a 2.5mm crochet hook (optional) and a few meters extra of CC or enough ribbon/ elastic to go twice round your head, with a few inches extra to spare.
Gage (not that this matters much) - 28sts per 10cm/ 4” swatch.

Pattern notes:

For reference, the stitch pattern written out as close to simple paired-down knitter’s code as I can get it. For more detail read the step by step instructions in the main pattern.

Worked over multiple of 8 sts +2.

Row 1 (wrong side): (MC) p to end
Row 2: (MC) k
Row 3: (MC) p1, *p and yo2 into next st, p2, p and yo2 into next st* repeat till last st, p1.
Row 4: (CC) k1, *sl1 and drop the 2yo’s, k2, sl1 and drop the 2yo’s* repeat till last st, k1.
Row 5: (CC) p1, *sl1, p2, sl1* repeat till last st, p1,
Row 6: (CC) k1, *sl1, k2, sl1* repeat till last st, k1.
Row 7: (CC) as row 5.
Row 8: (MC) k1,*drop st, sl2, drop st, pu 1st dropped st, sl2 back from RH needle, pu last dropped st, k4* repeat till last st, k1.

Repeat rows 1-8, finish with two rows st st in MC.


Pattern:


Using the main colour cast on 130 stitches. I used a cable cast on, but any stretchy one would do.

TIP: When casting on a large number of stitches, I recommend placing a stitch marker after every 25 stitches, so if you loose count you don’t have to go back to the start.

Rows 1 and 2: Still using the main colour, purl a row. This is the wrong side. Then turn and knit back to provide two rows of stocking stitch above the cast on edge.

Row 3: Purl one stitch. Put the needle into the next one as if to purl but wrap the yarn around it THREE times before pulling the stitch off the needle (i.e. you are adding an extra two stitches to the single one purling normally would have given you). Purl two stitches normally. Purl the next two stitches with the triple wrap. Continue like this, purling two normally, then working two with a triple wrap, until your last four stitches. Purl two normally, triple-wrap the next, then purl the last.

Row 4: Using the second (contrast) colour knit the first stitch. The next one you come to is one of the triple wrapped sets, slip all these (that is the next stitch, plus the two others attached to it) off the left hand needle and onto the right hand one, so you have one big dangly stitch of the main colour. The next two stitches should be ones you normally purled, so knit them. The set after that will be two of the triple-wrapped ones, so again slip them off to make two big dangly stitches. Continue like this across the row, knitting the simply-purled stitches and slipping off the great big triple-wrapped ones.

TIP: Make sure you keep the knit stitches tight and even; ensuring the slipped stitches are left large and as dangly as possible will help you do this.

Row 5: Still using the contrast colour, purl the stitches which you had knit previously and continue to slip the big dangly main colour ones.

TIP: If you see a stitch in the contrast, purl it, and simply slip all the main colour stitches.

Row 6: Still using the contrast colour, knit all those already worked in that colour, slipping the main colour ones.

Row 7: work exactly as row 5.

Row 8: Drop the contrast colour and pick up the main yarn again. Knit the first stitch. This is where things get a bit “wild” so I’ll take it step by step.

Step one: Slip and drop the next stitch (which should be one of the “dangly ones”). You are not going to drop it forever, so keep and eye on it and don’t go getting all excited and making a clapotis out of things.

Step two: Slip the next two stitches (which are the neat contrast colour ones) onto the right hand needle

Step three: Drop off the next main colour “dangly” stitch.

Step four: Using the left-hand needle pick up the first stitch you dropped. Next pass the last two slipped contrast colour stitches back onto the left hand needle from the right-hand one. Finally pick up the last dangly one you left dropped.

Step five: This will have created a neat little cross of the main colour over the panel of contrast yarn. Knit these four stitches with the main yarn.

TIP: Be careful not to twist any of the stitches when you finally knit them. You may find knitting into the back loop of a twisted stitch remedies this.

Continue doing this – dropping a stitch, slipping two, dropping the next, picking up the first, slipping back the two, picking up the last dropped stitch, then knitting them all – until the last stitch, which you simply knit.

Repeat rows 1-8 until you have the desired width of hair band – I did it three times, then end with two rows of stocking stitch in the main colour

When changing colour I just brought the yarn up from the stripe below – it cuts down on ends to weave it and won’t warp the pattern unless you pull VERY hard on it.

Cast off loosely. I used a knit-two-together cast off on a wrong-side row because it matched my cast on.

Repeating the pattern is what gives you the honeycomb/ lozenge shape over the main colour.

You can cross them the other way (i.e. left over right) in the middle repeat, but this is slightly fiddly as on row eight it involves passing the second dropped stitch under the first.

Using a crochet hook and the contrast yarn make two chains of single crochet, each long enough to go around the head plus several inches. You can use a narrow ribbon or elastic for this instead.

Looking at the knitted strip you should have a gap left between the stripes of contrast colour and crossed stitches of the main yarn. Using an embroidery needle, thread the crochet chains/ ribbon through the gaps left at the top and bottom of the knitted piece.

Pull the crochet chains/ ribbon tighter than the knitted piece, so that the edges of it frill rather than curl up.

Weave in ends.

Wash and block lightly, depending on yarn.

To wear, tie crochet chains/ ribbon in bow under hair at nape of neck.