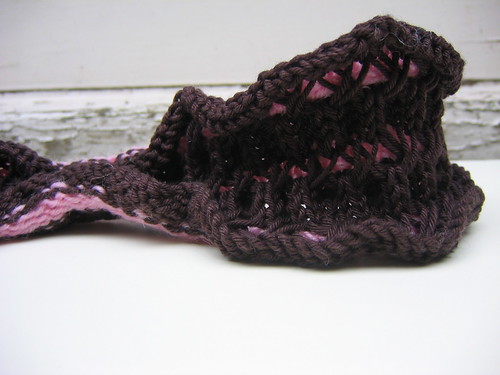
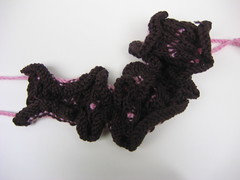
This design is very flexible. Literary - the cords that run down the sides allow it to be scrunched into a tight frill or relaxed out into flatter piece. In the hair, it can be worn as a girlish Alice-band or frilled up into a scrunchie. It also works round the neck as an elegant, rather Edwardian, “ruff” of a scarf. Or, if you want to be “wild” in a slightly risqué way, high on the thigh as a frilly garter.
Play with different yarn combos. Left-over ends of hand-painted sock yarn, oddments of mohair you can’t bring yourself to throw away – it’s a great stash buster.
Materials
- MC, approx. 40m 4ply yarn.
- CC, approx. 12m 4ply yarn.
- 2.5mm circular needle, any length.
- Stitch markers (optional).
- Embroidery needle.
- Either a 2.5mm crochet hook (optional) and a few meters extra of CC or enough ribbon/ elastic to go twice round your head, with a few inches extra to spare.
Pattern notes:
For reference, the stitch pattern written out as close to simple paired-down knitter’s code as I can get it. For more detail read the step by step instructions in the main pattern.
Worked over multiple of 8 sts +2.
Row 1 (wrong side): (MC) p to end
Row 2: (MC) k
Row 3: (MC) p1, *p and yo2 into next st, p2, p and yo2 into next st* repeat till last st, p1.
Row 4: (CC) k1, *sl1 and drop the 2yo’s, k2, sl1 and drop the 2yo’s* repeat till last st, k1.
Row 5: (CC) p1, *sl1, p2, sl1* repeat till last st, p1,
Row 6: (CC) k1, *sl1, k2, sl1* repeat till last st, k1.
Row 7: (CC) as row 5.
Row 8: (MC) k1,*drop st, sl2, drop st, pu 1st dropped st, sl2 back from RH needle, pu last dropped st, k4* repeat till last st, k1.
Repeat rows 1-8, finish with two rows st st in MC.
Pattern:
Using the main colour cast on 130 stitches. I used a cable cast on, but any stretchy one would do.
TIP: When casting on a large number of stitches, I recommend placing a stitch marker after every 25 stitches, so if you loose count you don’t have to go back to the start.
Rows 1 and 2: Still using the main colour, purl a row. This is the wrong side. Then turn and knit back to provide two rows of stocking stitch above the cast on edge.
Row 3: Purl one stitch. Put the needle into the next one as if to purl but wrap the yarn around it THREE times before pulling the stitch off the needle (i.e. you are adding an extra two stitches to the single one purling normally would have given you). Purl two stitches normally. Purl the next two stitches with the triple wrap. Continue like this, purling two normally, then working two with a triple wrap, until your last four stitches. Purl two normally, triple-wrap the next, then purl the last.
Row 4: Using the second (contrast) colour knit the first stitch. The next one you come to is one of the triple wrapped sets, slip all these (that is the next stitch, plus the two others attached to it) off the left hand needle and onto the right hand one, so you have one big dangly stitch of the main colour. The next two stitches should be ones you normally purled, so knit them. The set after that will be two of the triple-wrapped ones, so again slip them off to make two big dangly stitches. Continue like this across the row, knitting the simply-purled stitches and slipping off the great big triple-wrapped ones.
TIP: Make sure you keep the knit stitches tight and even; ensuring the slipped stitches are left large and as dangly as possible will help you do this.
Row 5: Still using the contrast colour, purl the stitches which you had knit previously and continue to slip the big dangly main colour ones.
TIP: If you see a stitch in the contrast, purl it, and simply slip all the main colour stitches.
Row 6: Still using the contrast colour, knit all those already worked in that colour, slipping the main colour ones.
Row 7: work exactly as row 5.
Row 8: Drop the contrast colour and pick up the main yarn again. Knit the first stitch. This is where things get a bit “wild” so I’ll take it step by step.
Step one: Slip and drop the next stitch (which should be one of the “dangly ones”). You are not going to drop it forever, so keep and eye on it and don’t go getting all excited and making a clapotis out of things.
Step two: Slip the next two stitches (which are the neat contrast colour ones) onto the right hand needle
Step three: Drop off the next main colour “dangly” stitch.
Step four: Using the left-hand needle pick up the first stitch you dropped. Next pass the last two slipped contrast colour stitches back onto the left hand needle from the right-hand one. Finally pick up the last dangly one you left dropped.
Step five: This will have created a neat little cross of the main colour over the panel of contrast yarn. Knit these four stitches with the main yarn.
TIP: Be careful not to twist any of the stitches when you finally knit them. You may find knitting into the back loop of a twisted stitch remedies this.
Continue doing this – dropping a stitch, slipping two, dropping the next, picking up the first, slipping back the two, picking up the last dropped stitch, then knitting them all – until the last stitch, which you simply knit.
Repeat rows 1-8 until you have the desired width of hair band – I did it three times, then end with two rows of stocking stitch in the main colour
When changing colour I just brought the yarn up from the stripe below – it cuts down on ends to weave it and won’t warp the pattern unless you pull VERY hard on it.
Cast off loosely. I used a knit-two-together cast off on a wrong-side row because it matched my cast on.
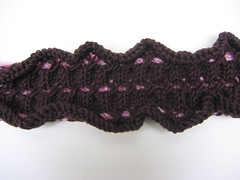
Repeating the pattern is what gives you the honeycomb/ lozenge shape over the main colour.
You can cross them the other way (i.e. left over right) in the middle repeat, but this is slightly fiddly as on row eight it involves passing the second dropped stitch under the first.
Using a crochet hook and the contrast yarn make two chains of single crochet, each long enough to go around the head plus several inches. You can use a narrow ribbon or elastic for this instead.
Looking at the knitted strip you should have a gap left between the stripes of contrast colour and crossed stitches of the main yarn. Using an embroidery needle, thread the crochet chains/ ribbon through the gaps left at the top and bottom of the knitted piece.
Pull the crochet chains/ ribbon tighter than the knitted piece, so that the edges of it frill rather than curl up.
Weave in ends.
Wash and block lightly, depending on yarn.
To wear, tie crochet chains/ ribbon in bow under hair at nape of neck.


