Two contrasting solid colours of sockyarn, at least 200 meters of each.
Tape measure (metric)
Dice
2mm (US size 0) circular needle, 80cm in length. Or set of dpns if you prefer not to magic-loop
Waste yarn for provisional cast on
Tapestry needle for weaving in ends
Gage (important) 32 sts to 10cm
Pattern Notes
This pattern uses Wendy’s toe-up pattern, there is an excellent knitty article on the subject if you haven’t tried it before.
This is written with magic-loop in mind, but proficient dpn user should be able to read it – you might find placing a stitch marker half way through the round helps (notes on the magic-loop technique can be found here).
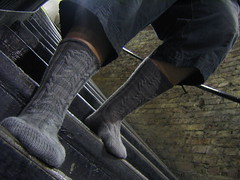
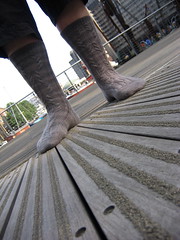
It might seem odd to have the hearts on one side of the foot rather than the middle, but it helps make the illusion visible around the shape of the foot and ankle. The effect works on either side of the foot, so you don’t have to worry about having left or right socks, although depending on the shape of your ankle and you may have a preferred way round to wear them.
Illusion knitting (in the round)
Each row of the chart is actually four rounds of knitting, one double-round stripe of each the MC and CC. The CC is, at heart, stocking stitch, giving a nice flat surface, where as the MC is based on the bobbles of garter. By swapping the MC to stocking you create a little valley, looking at the work from an angle you see through the valley onto the next “mountain” of garter stitch, which you provide by a corresponding swap of stitches in the next CC stripe.
When you work from the chart, for each row of the chart:
(CC) knit one round plain
(CC) knit the blank boxes, purl the filled in ones
(MC) knit one round plain
(MC) purl the blank boxes, knit the filled in ones
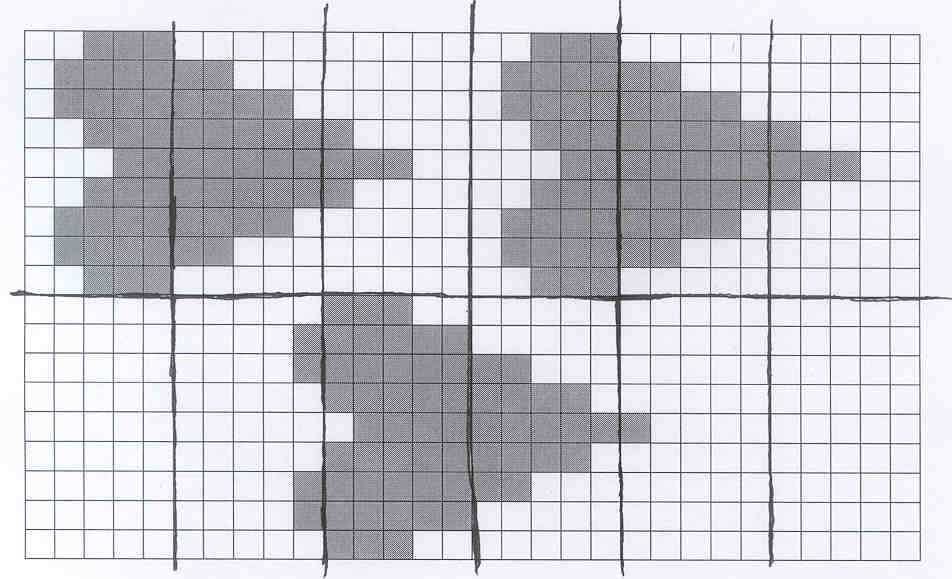
Credit: the chart is based on this design.
Illusion knitting in the round is easier than flat – because you always work RS, you can normally work out what you need to do from what’s been worked the rows below. Also, I choose to use this heart pattern rather than building a new one because its so beautifully logically put together, once I’d set up the first couple of rows I hardly needed to refer to the chart at all. Perfect bus knitting.
Pattern
Measure around the ball of your foot in centimetres, multiply this by 3.2 and divide by too. Round up the result to the nearest even number and this is how many stitches you will provisionally cast on using the CC.
For me, this number was 36, so using a crochet chain of waste yarn and the CC, I cast on 36 stitches.
Once cast on, start to work your short-row toe entirely in the CC. If you have a favourite way of doing this, go right ahead or check Wendy’s toe-up pattern for details.
Once complete and the provisional cast on is unzipped you should have half your stitches on one needle (the top of the foot) and half on the other (the underside of the foot). If you are dividing the stitches over more than two needles (i.e. using dpns) place a stitch marker so you know where the half way mark is.
Bring in the MC yarn and using it, knit one round.
Still using MC, purl to the end of the first needle/ stitch marker and then knit to end of the round.
Note: throughout, when changing colour just carry the yarn up, no need for a stupid number of ends to weave in.
Throw your dice (sorry “di”, singular). If you get an even number, start the chart on the 10th row (that’s row of the chart, not row of knitting), if you get an odd number start from the beginning. I threw an odd number, so start the pattern with one heart rather than two.
Swap to the CC and start to work the chart.
The chart is fewer stitches than the width of your foot (unless you are a pixie). Work the chart at the start of the round, once complete continue till the end of the needle/ stitch marker as if you were working blank charted boxes, then complete the round with nice flat stocking stitch for the underside of the foot.
Continue in pattern, following the chart, until the sock is about 5cm less than the length of your foot (you can put it on and try).
Hold the patterned half the sts (ones for the top of the foot) on an unused bit of needle/ dpn and work heel in the CC. This is done exactly the same way as the toe.
Once the heel is completed, slip the held stitches back into play and continue to work the striped illusion chart pattern in the round. This time you are going to repeat the pattern on the back of the sock as well as the front. However you want to work the chart at the end of the round rather than the start so that the hearts all collect near each other (again this sounds weird but is to do with the way the pattern arranges itself around the ankle). Work as a blank charted box until the last 30 stitches, then work the pattern till end of round.
Work in pattern until 1.5cm from desired length, ending after a patterned MC round. You should aim to finish this sock will half the CC yarn left.
Change to CC, knit one round.
Work 5 rounds of 1x1 rib.
Cast off loosely.
Count the number of completed hearts on the sock. Odds you love them, evens you don’t (or any other yes/ know question you wish to ask of the socks). If you don't like the answer give the socks to someone as a gift, this will bring good luck to all.
Now repeat process for second sock. If you prefer your socks to be a mirror-image of each other (and I do, I think it comes from being named Alice):
(a) reverse the chart for the second sock so the hearts point the other way, and
(b) swap which side of the foot you put the pattern on - i.e. for the top of the sock, knit to the last 30 stitches then work the chart, then when you have done the heel and are patterning the back too, on that side of the sock work the chart from the start of the second needle/ after stitch marker.
Warning: these socks are magical. If you do not finish the second one you will be cursed never to love again and the ghost of Virginia Woolf will come and haunt you. She is a long winded old cow who never shuts up and you don’t want this.